Chocolate-covered Homemade Marshmallows
As an Amazon Associate and member of other affiliate programs, I earn from qualifying purchases.
Even after Valentine’s day, you can still enjoy these fluffy Chocolate-covered Homemade Marshmallows .You can make them any day, any time. After you’ve sunk into these homemade marshmallows, you will never want to have the store bought ones again. It is not as intimidating as it looks. It was actually very easy to do. And once you get the hang of the process, you’ll never be able to stop.
One of the most important basic tools to have is a candy thermometer. I admit they are pricey for a kitchen tool, but I waited till the local craft store had them on sale, combined the price markdown with a discount coupon and did pretty good in the savings department.
But back to these mallows. I absolutely love marshmallows. I loved these homemade ones even more. These mallows turned out like soft, puffy, angelic, little clouds of sweetness once they were done. A few hours after, I went a step further and poured melted chocolate over it. The result was a gorgeous choco-mallow dream! Stick to the recipe below and follow everything well. I promise, you will love it so much and will never ever like ‘store bought’ again! And yes, you can make these marvelous marshmallows anytime, it will seem like Valentine’s everyday!
Chocolate-covered Homemade Marshmallows
Equipment
- Candy thermometer
- Cake stand mixer
- Large baking pan: 9 inches x 13 inches
Ingredients
- 1/4 cup powdered sugar for lining the pan
- 1/4 cup cornstarch for lining the pan
- nonstick spray for spraying pan
- 3 whole envelopes Knox unflavored gelatine
- 1 cup ice-cold water divided , use 1/2 cup first, rest later
- 1 1/2 cups granulated sugar about 1 1/2 cups granulated white sugar
- 1 cup Karo light corn syrup
- 1/4 teaspoon salt
- 1 teaspoon vanilla extract
- 1 3.5 oz. (100 g) regular chocolate candy bar for frosting
- 1 3.5 oz (100 g) dark chocolate candy bar for frosting
Instructions
- Prepare the pan. In a small bowl, combine the confectioners' sugar and cornstarch. Lightly spray a 13 x 9-inch baking pan with cooking spray. Sprinkle the sugar and cornstarch mixture all over, till it covers the pan completely. Make sure to cover the bottom and sides of the pan. If there is any remaining sugar-cornstarch mixture, put aside for use later.
- To make the marshmallows: Meanwhile, place the contents of the gelatin envelopes into the bowl of the stand mixer. Add 1/2 cup of the cold water. Make sure the whisk attachment of the mixer is close by.
- Separately, prepare the syrup. In a small saucepan, combine the remaining 1/2 cup water, granulated white sugar, corn syrup and salt. Cook on medium high heat, stirring to make sure no sugar burns to the bottom. Using a candy thermometer, clip it onto the side of the pan and continue to cook till the syrup mixture reads 240 degrees. This should take about 8 to 10 minutes. If you don't have a candy thermometer, you can use a meat thermometer, but do not let it lean on the pot or it will affect your reading. Once the mixture is this desired temperature, immediately remove the syrup from the stove top.
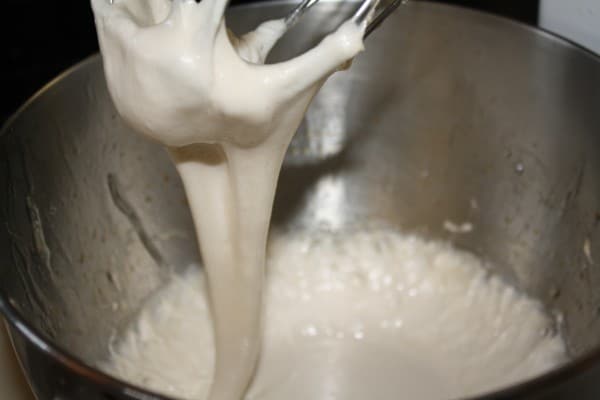
- Slowly pour the sugar syrup into the gelatin mixture waiting in the mixer bowl. Pour the syrup from the sides of the bowl. Work quickly and stir this mixture with a spoon to make the gelatin dissolve from its gelled state into the liquid sugar.
- Fit the whisk attachment on the stand mixer. To mix the gelatin-syrup mixture, allow the mixer to progress from a slow speed gradually increasing the speed to high. Continue to mix and whip till the mixture becomes very thick and feels lukewarm to the touch. This will take about 12 to 15 minutes. Add the vanilla extract at the last minute of whipping. You will notice the syrup-gelatin mixture will transform to a white, fluffy, elevated puffy mixture.
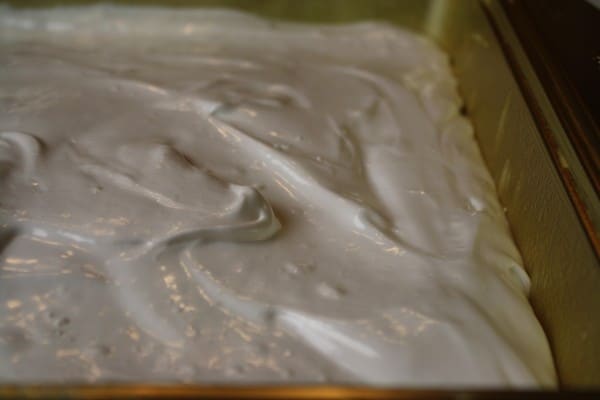
- Pour this mixture into the prepared pan lined with confectioners' sugar and cornstarch. Use a pre-oiled spatula to spread the white marshmallow mixture all over the pan. Using the remaining confectioners' sugar-cornstarch mixture left from the pan lining, lightly dust the top, till most of it is covered.
- Allow the marshmallow mixture in the pan to sit uncovered for at least 4 hours or up to overnight.
- To prepare for serving: After 4 hours or the next day, turn the marshmallow sheet out on the cutting board. If difficult to move, lift the corners with a well-oiled spatula and pull it out with your hands.
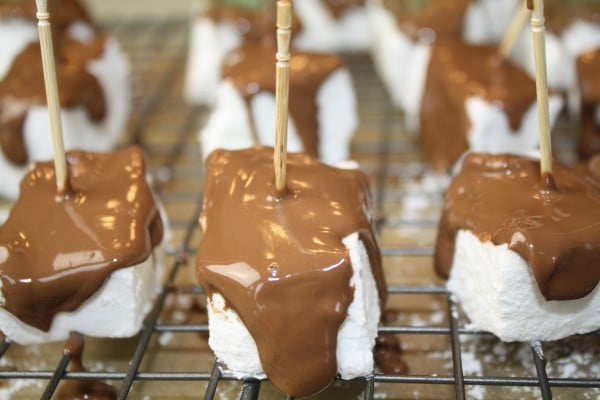
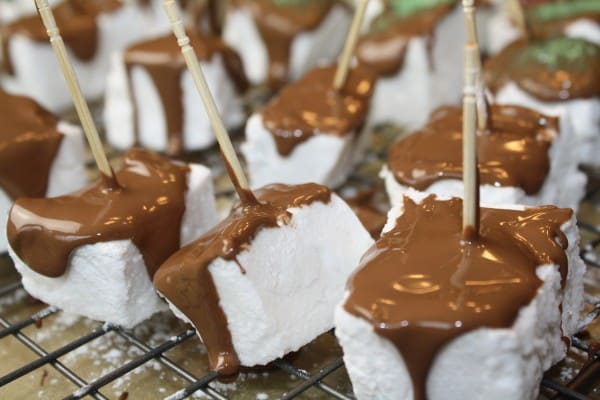
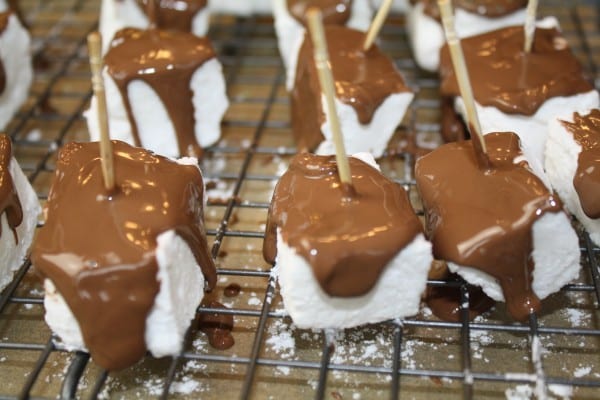
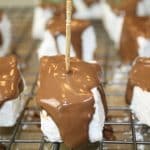
- To cut: Using a pre-oiled, pre-dusted with confectioner's sugar pizza cutter, cut the sheet into strips. Then cut them into cubes measuring 2 inches. Once cut, dust all sides with remaining powdered sugar-cornstarch mixture, adding more if needed. Transfer the mallows on a rack, where you can add the chocolate.
- To make the frosting for marshmallows : Cut up 2 whole chocolate candy bars into chunks. I used a combination of regular milk chocolate and the dark type.Microwave chocolate chunks on high for about 2 to 3 minutes. Repeat for 30 seconds more if not yet melted.
- Arrange bare marshmallow pieces on a rack, with a tray underneath it.
- As soon as the chocolate bars have melted, pour them over the marshmallows. Do this while chocolate is still hot.
- Have a piece of parchment or wax paper ready under the rack to catch the dripping chocolate.
- Freeze or refrigerate the choco-covered marshmallows, so that chocolate remains firm.
- Cook's comments: If you've never done homemade marshmallows from scratch before, here is a helpful video from my good friend Chef Jenni Field on how to do it. Though her recipe and ingredients slightly differ from mine, you'll see first hand how to make them. For other delightful recipes and baking tips, check out Jenni's site Pastry Chef Online, too.
Nutrition
Nutrition Notes: The nutrition information provided is an estimate and will vary based on cooking or baking methods and brands of ingredients used.
Did you love this recipe? I have more Philippine dessert recipes in my popular cookbook How to Cook Philippine Desserts, Cakes and Snacks.
If you need Filipino Instant Pot recipes, find more in my newest cookbook Instant Filipino Recipes: My Mother’s Traditional Philippine Cooking in A Multicooker Pot. Buy my cookbooks and books on Amazon.com sold worldwide in paperback and Kindle format.
Copyright Notice: Hello, Friends! Please DO NOT LIFT OR PLAGIARIZE my original recipe, stories, photos or videos. All the images and content on this blog are COPYRIGHT PROTECTED and owned by my media company Besa-Quirino LLC. This means BY LAW you are NOT allowed to copy, scrape, lift, frame, plagiarize or use my photos, essays, stories and recipe content on your websites, books, films, television shows, videos, without my permission. If you wish to republish this recipe or content on media outlets mentioned above, please ASK MY PERMISSION, or re-write it in your own words and link back to my blog AsianInAmericaMag.com to give proper attribution. It is the legal thing to do. Thank you. Email me at [email protected].

I still need to make marshmallows, they do look like fun to make! Your marshmallows look fabulous, Hugs, Terra
Thanks, Terra. You’re right ~ these were so much fun to make. In fact, I have more Knox & Karo ready for the next batch. Glad you came. Hugs 🙂
I’ve always wanted to try making my own marshmallows but I feel intimidated…This is perfect for today!
Hi Peachy! Yes, you can! Do it! You will love the natural flavors from homemade marshmallows & so will your family. Thanks for stopping by & Happy Valentine’s to you 🙂
My son will listen to what I ask him to do, if I say I’ll make homemade marshmallows… his favorite! I’m afraid of sugar overload and haven’t made, but this does looks delicious.. haha. 🙂
Hi, Nami. I know just what you mean about luring your son to obey by promising these homemade choco-covered marshmallows. I think I’ve seen you make mallows on your site, too. Aren’t they just amazing when it’s homemade? Thanks for the kind comments and the nice blog-visit. Always a pleasure to hear from you 🙂